OneCloud Pro
OneCloud Pro / Octopus Planet uses an S912 octa-core CPU with 2 GB of RAM and 8 GB of internal storage. It provides one Gigabit Ethernet port, two USB 2.0 ports, a TF card slot, and HDMI output.
Docker and DEB package deployments are available and relatively easy to set up. To use the integrated image, sponsor the author and contact them to obtain it.
Integrated Image Overview
The latest integrated image names for OneCloud Pro / Octopus Planet are:
One-KVM-RUST_by-SilentWind_Onecloud-Pro_v0.2.8_261007-82148deaa.img.xzOne-KVM-RUST_by-SilentWind_Onecloud-Pro-Hwcodec_v0.2.6_260803-da20d8b.img.xz
Advantages:
- Both images include the PiKVM MSD kernel patch, supporting ISO images larger than 2.2 GB and custom virtual media device names.
- The former is based on the ophub system with a Linux 6.12.x kernel; the latter is ported from the Khadas VIM2 system with a Linux 4.9.x kernel and supports Amlogic hardware codecs.
The former integrated image provides HDMI output on both OneCloud Pro and Octopus Planet. The latter provides HDMI output only on OneCloud Pro, not on Octopus Planet.
The latter integrated image supports hardware codecs and can use Amlogic hardware encoders for AMLENC H.264/H.265 video encoding. The installation process is the same for both images, so choose according to your needs.


Integrated Image Deployment
OneCloud Pro
- Prepare the SD card: Write the One-KVM integrated image to an SD card, then insert the card into the OneCloud Pro card slot.
- Boot from the SD card: When flashing from the factory system for the first time, hold the Reset button and connect power. Release Reset when the OneCloud logo disappears. For subsequent flashes, simply connect power to boot the system from the SD card automatically.
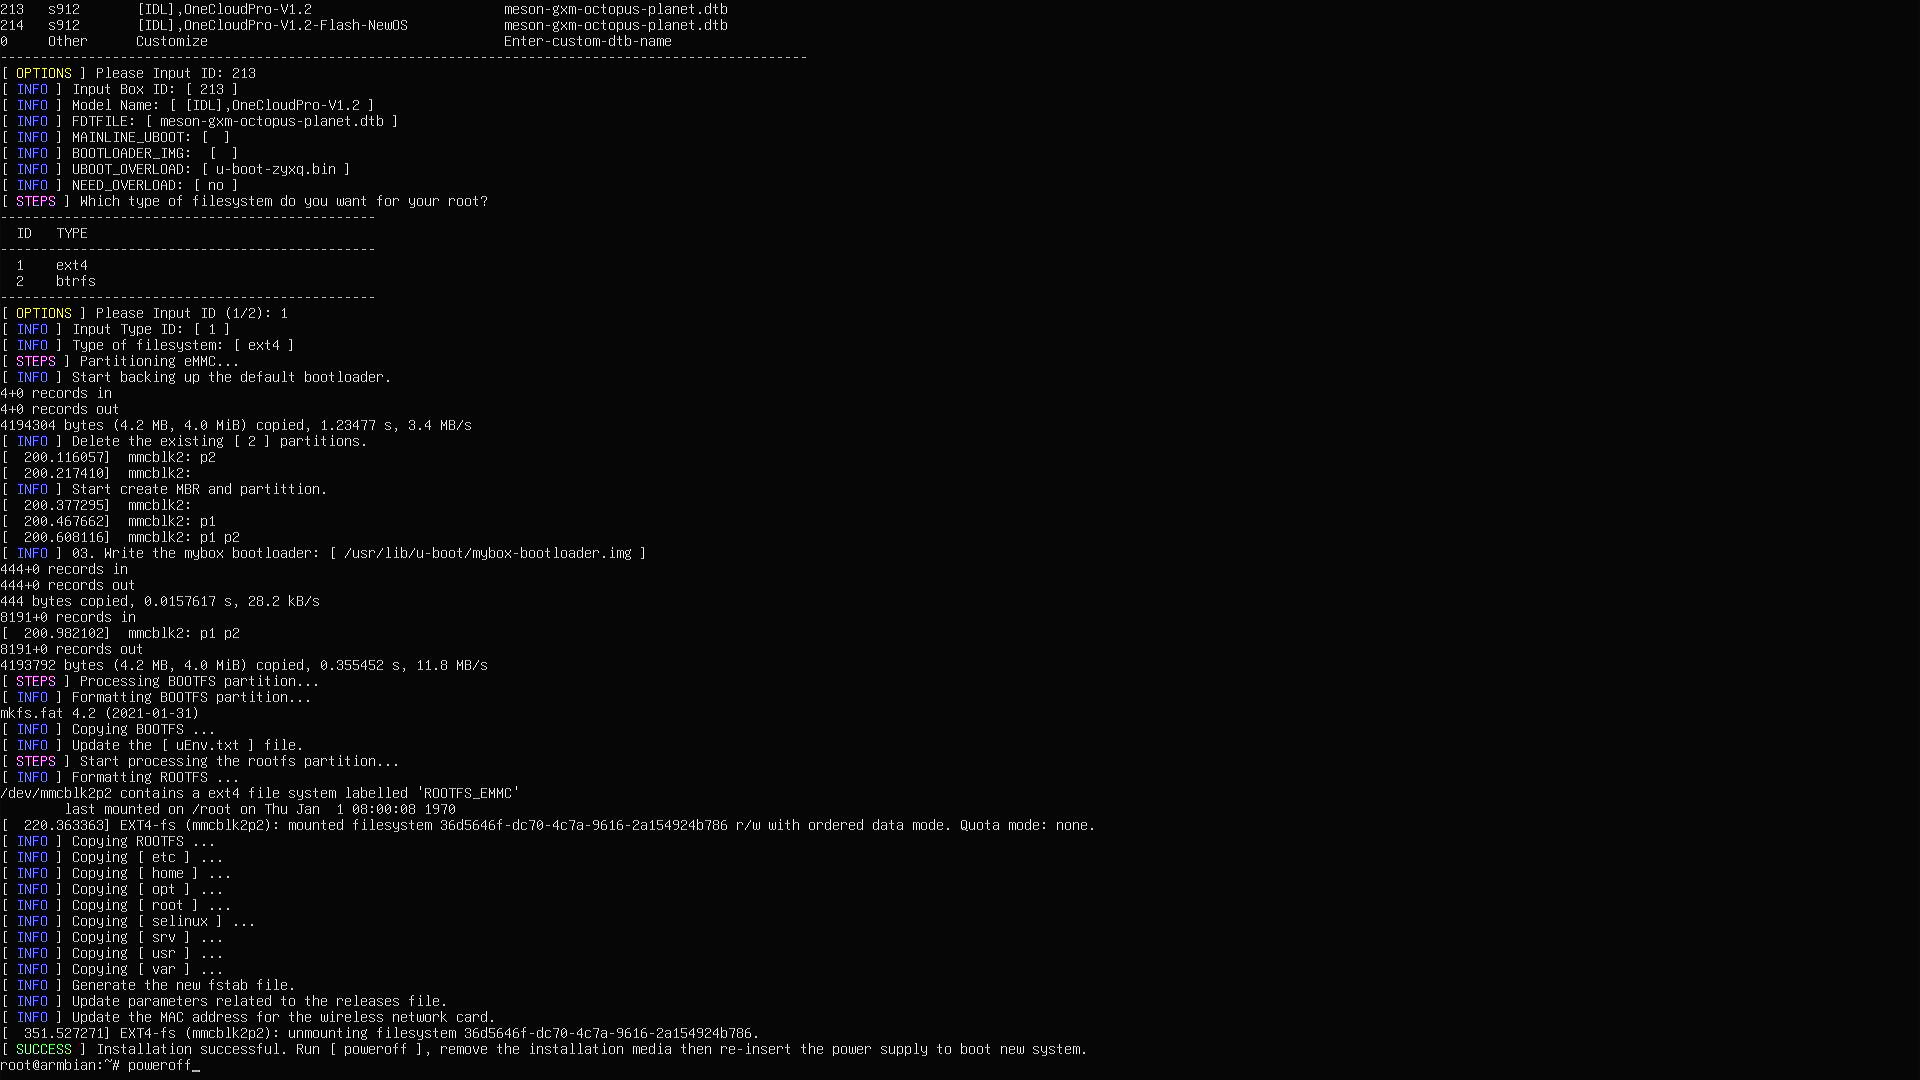
- Install the system to eMMC: After the system boots successfully from the SD card, sign in through HDMI, the serial console, or SSH and run
armbian-install. Select the model that matches the board revision:201for V1.1 or213for V1.2.
The following screenshot shows the armbian-install process:
Octopus Planet
- Flash the base image: Flash the Octopus Planet base image (
Tools/章鱼星球底包_by-SilentWind.burn.img) using Amlogic USB Burning Tool. - Prepare the SD card: Write the One-KVM integrated image to an SD card, then insert the card into the Octopus Planet card slot.
- Boot from the SD card: After flashing the base image, connect power and the system will automatically boot from the SD card.
- Install the system to eMMC: After the system boots successfully from the SD card, sign in through HDMI, the serial console, or SSH and run
armbian-install. Select201for an original board or202for a clone board.
If you need to reflash the device later, write the new image to an SD card. After inserting the card and powering on the device, it will prioritize booting the system from the SD card.
Usage Notes
After the first boot, the system has approximately 4.5 GB of available storage.
Hardware connections
- Plug the USB HDMI capture card into the standard USB port next to the Ethernet port, then connect the capture card to the target machine's HDMI output with an HDMI cable.
- Plug one end of the USB male-to-male cable into the USB OTG port next to the QR code and the other end into a USB port on the target machine.
- Make sure all connections are secure, then connect Ethernet and power.
Hardware safety warning
To avoid potential risks, such as the target device failing to boot or recognize devices, and in very rare cases hardware damage, we strongly recommend taking one of the following safety measures before using a USB male-to-male cable:
Option 1: Cut or remove the red 5V power wire (VCC) in the USB cable, leaving only the data wires (D+/D−) and ground (GND), to prevent back-powering.
Option 2: Insert a USB hub with an independent power switch in the USB link and make sure its power switch is off when connecting.
Some low-power devices may be back-powered through the USB OTG port from the KVM device when main power is not connected. This can put the device into an abnormal state, and it may still fail to boot normally even after main power is connected later.
Unless you clearly understand the consequences, use the protections above to keep devices safe.
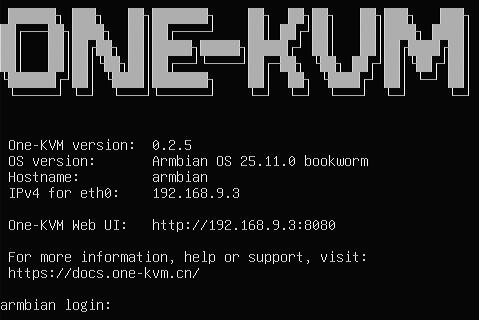
HDMI terminal
The HDMI terminal displays the device IP address and software version.
SSH remote login
SSH is enabled by default on Armbian. The initial username and password are root / 1234. Change the default password as soon as possible.
System upgrade warning
Do not use apt upgrade to upgrade the kernel and device tree. This may cause system problems and make OTG unavailable.
Changing the MAC address
The current image persists the network interface MAC address in /etc/one-kvm-image/eth0.mac. Sign in over SSH and run:
To use a different MAC address, replace 02:11:22:33:44:55 in the example.
USB function combinations
| Combination | Result |
|---|---|
| Keyboard (including status LEDs) + relative mouse + absolute mouse + multimedia keys | Passed |
| Keyboard (including status LEDs) + relative mouse + absolute mouse + multimedia keys + MSD | Passed |
| Keyboard (including status LEDs) + relative mouse + absolute mouse + multimedia keys + MSD + NCM/ECM | Unsupported |
| Keyboard (including status LEDs) + relative mouse + absolute mouse + multimedia keys + RNDIS | Unsupported |
| Keyboard (including status LEDs) + relative mouse + absolute mouse + multimedia keys + MSD + RNDIS | Unsupported |
| Keyboard (including status LEDs) + relative mouse + absolute mouse + RNDIS | Passed |
| Keyboard (including status LEDs) + relative mouse + absolute mouse + MSD + RNDIS | Unsupported |
| Keyboard (including status LEDs) + relative mouse + absolute mouse + MSD + NCM/ECM | Passed |
Performance Test Report
Test image: One-KVM-RUST_by-SilentWind_Onecloud-Pro_v0.2.5_260722-da20d8b.img.xz
- Run ID:
20260722-222014-7f19dd - Test device: OneCloud Pro (
onecloud-pro) - Video device:
/dev/video1(1080p@50fps MJPEG, 1080p@10fps YUYV) - HID device: OTG
- HTTP latency: p50=3.1ms, p95=3.8ms, max=4.0ms
Video Performance
| Video input parameters | Test frame rate | Latency statistics (median p50 / 95th percentile p95 / maximum max) |
|---|---|---|
| 1080p@50fps MJPEG → MJPEG | 50fps | p50=76.0ms, p95=94.2ms, max=97.1ms |
| 1080p@50fps MJPEG → H.264 | 25.2fps | p50=298.7ms, p95=319.8ms, max=323.2ms |
| 1080p@50fps MJPEG → H.265 | 3.9fps | p50=779.9ms, p95=858.5ms, max=867.1ms |
| 1080p@10fps YUYV → MJPEG | 9.5fps | p50=326.5ms, p95=368.4ms, max=378.4ms |
| 1080p@10fps YUYV → H.264 | 9.5fps | p50=635.2ms, p95=702.1ms, max=718.0ms |
| 1080p@10fps YUYV → H.265 | 2.7fps | p50=1391.4ms, p95=2091.3ms, max=2259.4ms |
HID Performance
| Input method | Latency statistics (median p50 / 95th percentile p95 / maximum max) |
|---|---|
| OTG | p50=2.6ms, p95=3.0ms, max=3.0ms |
MSD Performance
| Operation | Data |
|---|---|
| Write | 10.03 MiB/s |
| Read | 14.59 MiB/s |
OTG mode and hardware encoding
The integrated image defines OTG mode in the device-tree. Convert the DTB to DTS, change the usb@d0078080 dr_mode property to peripheral or host, convert it back, and reboot.
The V4L2M2M driver supports NV12/YUYV input and H.264/H.265 output. The MJPEG-to-H.264/H.265 path software-decodes MJPEG to NV12 before hardware encoding and reaches about 1080p30 at the default CPU frequency.