OEC/OECT
Hardware Overview
The OEC TURBO uses an RK3566 CPU with 4 GB of RAM and 8 GB of internal storage. It provides Gigabit Ethernet, one USB Type-C port, one USB 3.0 port, and an internal SATA drive bay. Its open VPU driver allows One-KVM to support H.264 and H.265 hardware encoding on this device for a better video experience.
Docker and DEB package deployments are available and relatively easy to set up. To use the integrated image, sponsor the author and contact them to obtain it.
Integrated Image Overview
The latest integrated image for OEC/OECT is:
One-KVM-RUST_by-SilentWind_OEC-Turbo_v0.2.6_260803-da20d8b.img.xz
Advantages:
- Includes the PiKVM MSD kernel patch, supporting ISO images larger than 2.2 GB and custom virtual media device names.
- Based on an ophub image with a Linux 6.1.x kernel, supporting RKMPP and RKNPU.
The image can only be flashed onto original locked OEC/OECT devices. Do not flash it onto other standard RK3566 devices, or the device may be bricked and fail to boot.
Integrated Image Deployment
File preparation
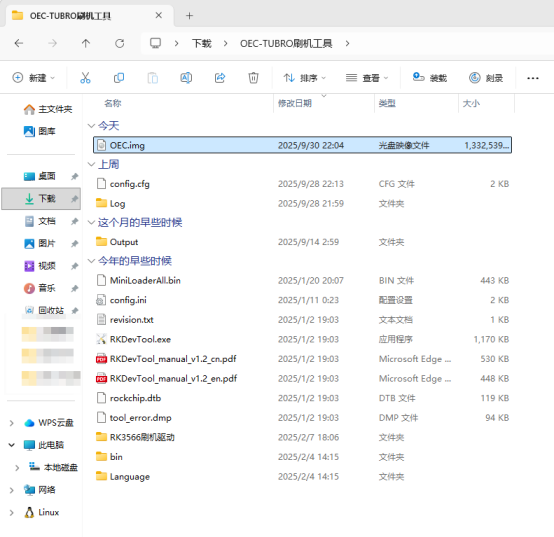
Download and extract the OEC TURBO flashing tool and the One-KVM integrated image, then open the flashing tool directory. We recommend renaming the extracted One-KVM image to a shorter name, such as OEC.img, and placing it in the flashing tool directory so that the flashing progress remains visible.
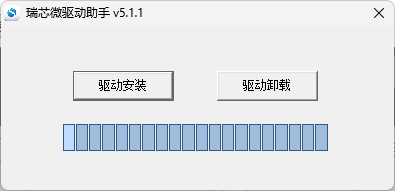
If the Rockchip driver has not been installed before, run OEC-TUBRO刷机工具\RK3566刷机驱动\DriverInstall.exe to install it. Skip this step if the driver is already installed.
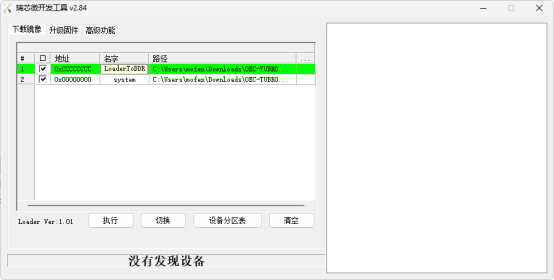
Open RKDevTool.exe, click the ellipsis button next to each path, and update the boot file and One-KVM system image paths. The boot file is MiniLoaderAll.bin in the flashing tool directory.
The image also works with other OECT variants and OEC devices, but you must replace MiniLoaderAll.bin with the appropriate boot file before flashing. See Flashing Armbian on Netcenter OEC/OECT for details.
Start flashing
Disassemble the device and short the resistor on the board to enter MASKROM mode.
To disassemble a Netcenter OEC:
- Push the bottom cover upward to open it.
- At the SATA drive bay and USB Type-C side, remove the four screws.
- Push the enclosure upward and remove the side panel. Unscrew the three screws securing the SATA connector, turn the connector over, and peel off the black tape protecting its ribbon cable. The SATA ribbon cable is thin and fragile, so do not pull it. Lift the black latch on the left to unlock the connector, then gently remove the ribbon cable.
- Remove the eight screws from the inner enclosure. Insert a card into the gap on the left, carefully pry it open, and remove the inner enclosure.
- Locate the resistor to be shorted on the front of the mainboard.
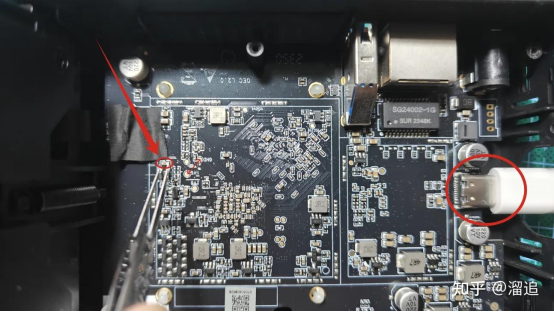
Short the resistor first, then connect the USB Type-C data cable. The device does not require its 12 V DC power supply while flashing. Release the shorting tool after approximately two seconds. When the application reports that a MASKROM device has been detected, click Run and wait for the image to finish flashing.
If a newer flashing tool reports that the system exceeds the flash size, select the forced address write option above the Run button and try again.
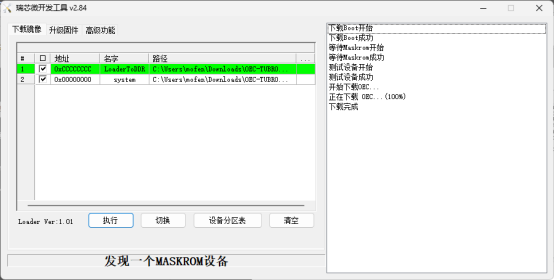
After flashing is complete, disconnect the USB Type-C cable and connect the 12 V DC power supply to start the system.
For subsequent reflashing, shorting the resistor is not required. Hold the RESET button while connecting the device to a computer via USB. RKDevTool will show it as a Loader device. You do not need to flash the loader at 0xCCCCCCCC (uncheck it); flash only the firmware section at 0x00000000.
Usage Notes
After the first boot, the system has approximately 5.1 GB of available storage.
Hardware connections
Connect the USB Type-C OTG port to the target machine. Connect the USB capture card to the standard USB 3.0 port.
Hardware safety warning
To avoid potential risks, such as the target device failing to boot or recognize devices, and in very rare cases hardware damage, we strongly recommend taking one of the following safety measures before using a USB cable:
Option 1: Cut or remove the red 5 V power wire (VCC) in the USB cable, leaving only the data wires (D+/D−) and ground (GND), to prevent back-powering.
Option 2: Insert a USB hub with an independent power switch in the USB link and make sure its power switch is off when connecting.
Some low-power devices may be back-powered through the USB OTG port from the KVM device when main power is not connected. This can put the device into an abnormal state, and it may still fail to boot normally even after main power is connected later.
Unless you clearly understand the consequences, use the protections above to keep devices safe.
SSH remote login
SSH is enabled by default on Armbian. The initial username and password are root / 1234.
System upgrade warning
Do not use apt upgrade to upgrade the kernel and device tree. This may cause system problems and make OTG unavailable.
USB function combinations
| Combination | Result |
|---|---|
| Keyboard (including status LEDs) + relative mouse + absolute mouse + multimedia keys | Passed |
| Keyboard (including status LEDs) + relative mouse + absolute mouse + multimedia keys + MSD | Passed |
| Keyboard (including status LEDs) + relative mouse + absolute mouse + multimedia keys + MSD + NCM/ECM | Unsupported |
| Keyboard (including status LEDs) + relative mouse + absolute mouse + multimedia keys + RNDIS | Passed |
| Keyboard (including status LEDs) + relative mouse + absolute mouse + multimedia keys + MSD + RNDIS | Unsupported |
| Keyboard (including status LEDs) + relative mouse + absolute mouse + RNDIS | Passed |
| Keyboard (including status LEDs) + relative mouse + absolute mouse + MSD + RNDIS | Passed |
| Keyboard (including status LEDs) + relative mouse + absolute mouse + MSD + NCM/ECM | Passed |
Performance Test Report
Test image: One-KVM-RUST_by-SilentWind_OEC-Turbo_v0.2.5_260723-da20d8b.img.xz
- Run ID:
20260723-114600-087e44 - Test device: OECT (
oec-turbo) - Video device:
/dev/video0(1080p@60fps MJPEG, 1080p@60fps YUYV) - HID device: OTG
- HTTP latency: p50=3.9ms, p95=4.8ms, max=4.8ms
Video Performance
| Video input parameters | Test frame rate | Latency statistics (median p50 / 95th percentile p95 / maximum max) |
|---|---|---|
| 1080p@60fps MJPEG → MJPEG | 59.9fps | p50=80.5ms, p95=93.2ms, max=96.3ms |
| 1080p@60fps MJPEG → H.264 | 52.7fps | p50=154.1ms, p95=191.4ms, max=194.5ms |
| 1080p@60fps MJPEG → H.265 | 54.6fps | p50=140.5ms, p95=169.2ms, max=169.7ms |
| 1080p@60fps YUYV → MJPEG | 34.6fps | p50=218.9ms, p95=235.8ms, max=237.5ms |
| 1080p@60fps YUYV → H.264 | 46.8fps | p50=178.8ms, p95=184.3ms, max=184.6ms |
| 1080p@60fps YUYV → H.265 | 48fps | p50=153.6ms, p95=169.7ms, max=172.8ms |
HID Performance
| Input method | Latency statistics (median p50 / 95th percentile p95 / maximum max) |
|---|---|
| OTG | p50=3.4ms, p95=3.9ms, max=4.0ms |
MSD Performance
| Operation | Data |
|---|---|
| Write | 10.94 MiB/s |
| Read | 25.66 MiB/s |